Design Layout
Typically, many homeowners purchase a plant then try to find a place to plant it. This often results in a haphazard landscape that ultimately becomes a burden on the homeowner's time and pocketbook. To avoid this, you should develop a plan to conceptually guide you through the landscaping process. By working out a plan before you ever pick up a shovel, you will discover potential problems and fix them before any money is spent. Developing a plan is easier than you might think. By following the step-by-step procedure outlined in this section, you will create a successful landscape to meet your needs and protect the environment.
Note: Even if you are going to hire a professional to design your native and adapted plant landscape, you will want to scan this section for general information. If you are going to "do it yourself," this section is just what you need. This section will walk you through the process of designing a landscape that functions well for you as well as the environment.
Develop A Base Map
Find a map of your property indicating the position of your property lines, home easement, and any other structures. Make a few copies of this map that you can work from. If you do not have such a map, contact the county records office for a copy. If no map is available, it is not difficult to create one.
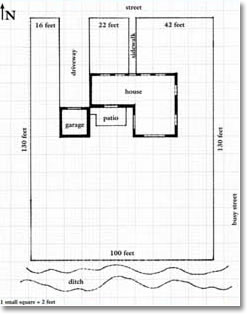 Figure 1Let's assume you are starting from scratch. Get a sheet of graph paper on which to draw your map. Determine your property dimensions and decide on an appropriate scale (for example one square on the graph paper equals one foot). It may take a little figuring to arrive at the right scale to fit your property on the graph paper. Once you have done that, sketch your property lines on the graph paper using the squares to maintain appropriate dimensions.
Also indicate (with an arrow on your map) which direction is north. Once you have done that, sketch the locations of any of the "hardscape" items such as buildings, sidewalks, driveways, etc. Remember to maintain the appropriate scale when sketching these structures. Indicate where doors and windows are located in each building. This will become important later. Once you have made a scaled base map (Figure1) that outlines your property and indicates the position of all buildings, walkways, etc., make ten copies of it. These will be used in subsequent steps.
Inventory Your Property
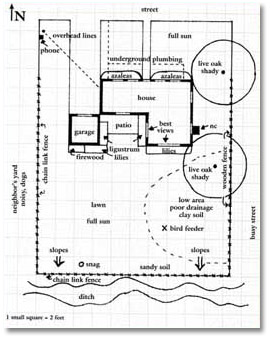 Figure 2Now take one copy of your base map and begin to inventory existing conditions and features of your property (Figure 2). Determine the location and height or depth of any utility lines or buried cables that are found on your property. Sketch and label these lines on your inventory map. To inventory existing vegetation such as trees or large shrubs, measure from the trunk out to the tip of the branches. Then use that measurement to draw a circle representing the spread of that plant on your inventory map. Identify each large plant by its common name on your map. Draw and label other vegetation as necessary on your inventory map.
Next draw on your map the locations of any flowerbeds that may exist on your site. Once you have inventoried the vegetation, inventory the environmental conditions. Indicate on your map general soil conditions and label areas that are sunny, shady, wet, dry, sloped, etc. Show wildlife features such as tree cavities, nesting areas, or water sources. Lastly, indicate neighboring property features (e.g. roads, fences, noisy pets, overhanging trees, etc.) that affect your property.
Current Uses
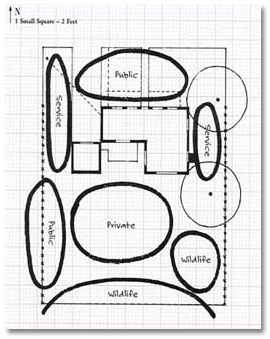 Figure 3Once you have sketched the existing features and conditions of your property, you must now consider how your property is currently used. Using another copy of your base map, sketch in circular areas indicating how your property is currently used. Label each area according to its category: public, private, service, or wildlife (Figure 3).
Public areas are usually associated with structures such as sidewalks, driveways, roads, etc. Private areas are the parts of the yard that you and your family use. Examples may include the patio, deck, or lawn area. Service areas are associated with work spaces that you may want to screen from sight. These areas may include the air conditioner unit and its access, garbage can, storage, compost pile, or firewood stack. Wildlife areas are those spaces that provide some type of food, water, or shelter for wildlife. These areas may include patches of prairie, wildflowers, woodland habitat, or other open space. Indicate all of these on your Current Uses map.
Future Uses
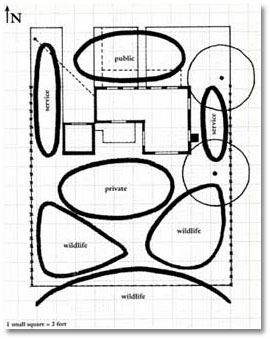 Figure 4Now that you have mapped all of the existing features, conditions, and uses of your property, it's time to dream. What would you like to do with your property? While referring to your inventory map and your current use map, use another copy of your base map to begin sketching in ideas and notes about what you like to do. Don't worry about specific plants yet. We will get to that. For now, just keep your ideas conceptual.
Once again, with circles indicate how you would like to change the current use patterns for the future. Maybe you would like to reduce the public areas and increase private and wildlife areas. Indicate these changes on your future uses map (Figure 4).
Functional Plan
While referring to the maps you have created, start thinking about the functions you will want your landscape to perform. Where will you want your landscape to screen unsightly views? Where will you want color? Where will you want berry-producing shrubs? Where will you want attractive views? Take some time to look at your property through various windows, from the patio, from the road, etc. Use these views to help you decide what you want your landscape to "do" for you. Sketch and label these functions on your function plan(s) (Figures 5 & 6). Note that we still have not used specific plant names. We are not there yet. Sketch and label the locations of any water source, rocks, bird feeder, or any other feature that you would like to add.
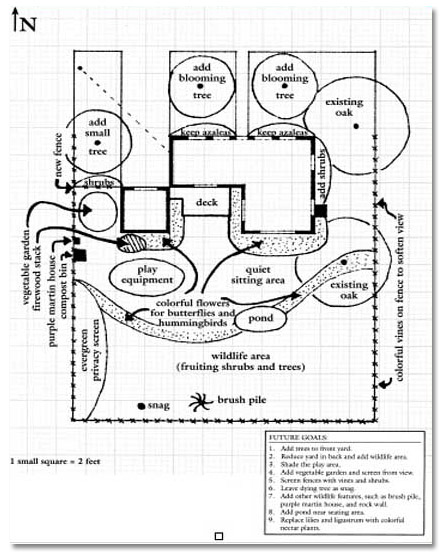 Figure 5
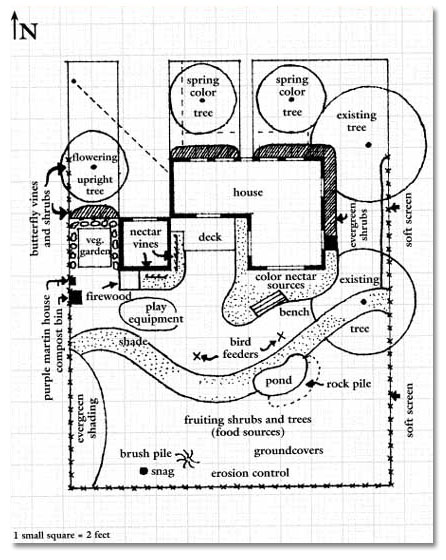 Figure 6
When designing beds and spaces in your landscape, you should keep several things in mind. First, curved lines in the landscape soften the yard experience. They give a more natural feeling to the property. Curved lines are more relaxing and often make spaces seem larger and more open. Angular lines imply control and structure. Be aware of these concepts and use them to achieve an effect that pleases your taste.
Second, spaces that are enclosed with visible boundaries may be perceived as small and confining. To alleviate this, you may consider disguising boundaries with vegetation, or create softer ones by using open materials such as lattice or chain link fencing.
Third, colors affect your perception of space. "Cool" colors (blue, green, violet) seem to retreat visually giving the impression of greater space. "Warm" colors (red, orange, yellow) seem to surge forward, making a space seem smaller. Use these concepts when developing your function plan to achieve a result that suits your objective.
Finally, by designing your landscape to include various vertical layers of native vegetation, you will be helping provide habitat for wildlife. When layering your landscape, keep in mind that it's generally more visually appealing to place shorter plants in front and taller plants toward the back of a space. When planting beneath windows use plants with a maximum height shorter than the windowsill to avoid obstruction. When planting beneath power lines, use only trees and shrubs with a maximum height less than the height of the power line.
Final Plan
Now that you have done all of the hard work, selecting specific plant species is simply a process of elimination. Simply use the information from your maps to determine the sun/shade conditions, soil conditions, height and/or color requirements of the specific site you are wanting to plant, then filter out those species that do not match the criteria. To assist you with this, we have included a database of plants on this web site. Simply select the desired criteria and the filter will return appropriate plants for you to use in that site.
Once you have obtained a listing of specific native and adapted plants, indicate these on a final plan (Figure 7) that can then be used as a guide to create a SmartScape™. Be aware that plant availability from nurseries will need to be considered and that alternative choices of native and adapted species may be needed.
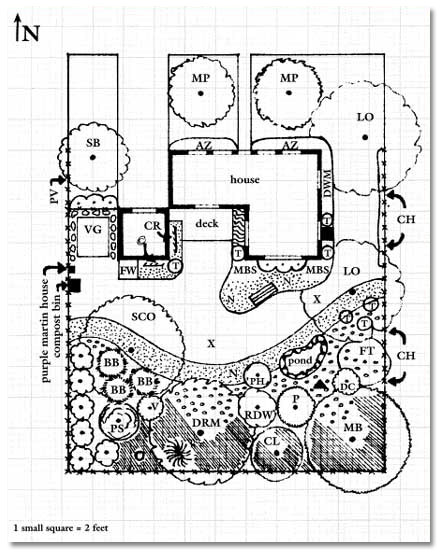 Figure 7